
If you’re from the Hamilton area, chances are good that you know of at least one massive staircase that goes up the escarpment – there are currently 5 total. Walking or running the stairs in Hamilton is a great way to get outside and challenge your body.
My current favourite staircase is the “Chedoke stairs”. The base is located near the Chedoke Golf course and its top is at the West Mountain. It is 298 steps of pure fun. And while it’s not the only staircase in Hamilton, I do find it to be one of the hardest flights with easiest parking lot to access as someone who doesn’t live in Hamilton.
If you’re looking for workouts you can do on these stairs, look no further!
1) CN Tower Walk
This is probably my favourite way to tackle the stairs, just because it is the most straight-forward. It is a goal directed walk of the stairs and a test of endurance.
The CN tower in Toronto has 1,776 steps, so if you walk up the Chedoke stairs 6 times that’s essentially the equivalent of climbing the tower straight. Now obviously, we’re not including the descent of the stairs in this equation – but you can if you want to.
However, I have heard some people argue that the CN Tower is equivalent to 10 climbs of the Chedoke stairs. I’m guessing this is based on the fact that the CN tower has 144 flights, and if you estimate a flight at 20 steps, it works out to close to 10 time the Chedoke stairs. The CN tower has just 12 steps per flight so do with this what you will – you can choose 6x or 10x the Chedoke Stairs to accomplish this.
I basically make this a time competition. How fast can I do 6 climbs of the Chedoke stairs (i.e. scale the CN tower)? I usually start off at a faster speed and end with a slow (controlled!) trek up the last couple of flights.
You can also adapt this to any building you’d like to metaphorically climb. For instance, the 911 climb is 110 flights of stairs – that’s approximately 7 climbs up the Chedoke staircase.

2) Mixed Stepping
If you do this one right, it can be more of a leg strengthening exercise than a cardio workout.
This is where each ascent up the stairs, or even at each landing, you change the way you step. You can start off with your basic stepping, then transition to a larger stride and hit every second step. Then you can repeat.
Alternatively, you can walk sideways up the stairs, leading with either leg and having your back leg do a crossover. Switch this up as you ascend.
The real tip here is to make sure you’re pushing with your leading leg and reducing the assistance from the leg behind you. Essentially, you’re doing mixed lunges up the stairs so follow lunge mechanics to really turn this into a booty-targeting stair climb.
An example workout can be:
2 stair flights “normal”
2 stair flights “Every second step”
2 stair flights “left leg leading”
2 stair flights “right leg leading”
and repeat.
I’ve seen some people walk down the stairs backwards as another alternative way of stepping. For some, this can be easier on the knees but obviously be aware of your surroundings when doing this.

3) Sprint Interval Training
I recently listened to the Mel Robbins Podcast with Dr. Stacey Sims as the guest speaker. Click here to access the episode – I highly recommend giving this a listen!
During this interview, Dr. Sims touched on the concept of sprint interval training (SIT) and how beneficial it is for women. Essentially, it is a max effort activity done for 30 seconds, with a 1 minute 30 second to a 2-minute break between each max effort. She recommended doing this a maximum of 5 times. I like it this because not only is it great for heart health, but it is also a pretty intense workout in a very short time span. Perfect for moms and those with busy lifestyles.
What this could look like on the stairs: running up the stairs as fast (and safely) as you can for 30 seconds. Then, you can either stop and stay standing where you are and rest. Or, for those who want more or who have a higher level of fitness, your rest period can be slowly continuing your climb up the steps. The most important part here is making sure your heart rate decreases back to an acceptable level where on your next stair sprint, you’re able to give your maximum effort. In other words, you’re pushing your heart rate to its max and breathing heavy after those 30 seconds.

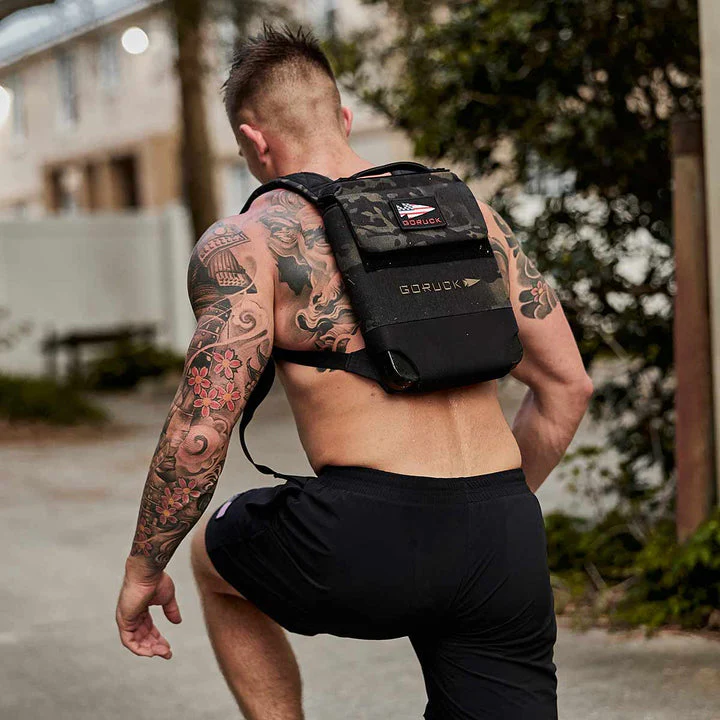
4) Weighted or backpack training
I’ve recently been getting into rucksack training. This is training – walking, running, hiking, bodyweight workouts – with a weighted bag on your back. It originated from army training where soldiers would be training with their packs or “rucks” on their back. Rucksack training has benefits for your heart, your posture, your core, building muscle, your bone health, and a whole heck of a lot more. It’s a very accessible way of training that anyone from beginners to advanced athletes can do. It can also build your endurance and your mental toughness.
Thus, rucking or weighted training is something that you can try on the Chedoke stairs. You can just add some form of weight carrying and then just tackle climbing the stairs. You can scale this to your level: do a straightforward stair walk if you’re a beginner or new to weighted walking, or you can get fancier if you have some experience. Here, you can increase your weighted carry, or you can add in any of the other workouts in this post.
If you want to get into rucking, I recommend the GORUCK Ruck Carrier 3.0. You can purchase the weighted plates separately, either from the same provider or from amazon. The general rule of thumb is to go with 30% of your bodyweight when rucking. You could also try a weighted vest and there are many options available on amazon. Weighted vests, however, are limited in the weights that you’re able to increase to, and because of the way they sit on your body, they may not be as comfortable or stress your core as much as a rucksack.
5) Stairway to Failure
This one is for those of us who’d really like to struggle to sit down the next day. You essentially just walk/run the stairs until you can’t anymore. In other words, you hit muscle failure. While this sounds a little crazy, the cool thing about this workout is that if you do it consistently or say you do it at the beginning of the summer and then at the end of the summer, you’ll be able to directly see if you’ve gotten stronger. If you walk/run longer and further, you’ve improved.

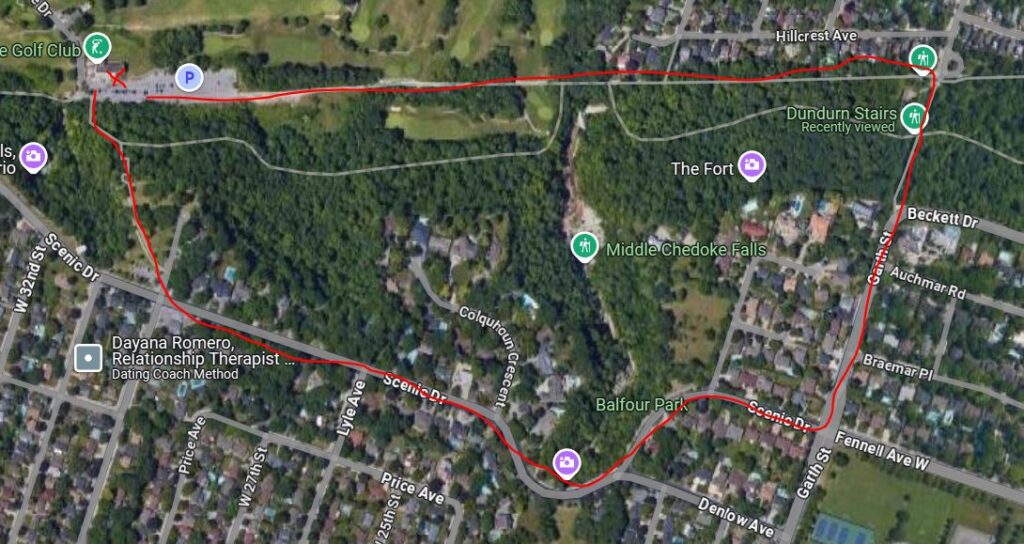
6) Stair loop with Dundurn
If you’re a person who likes to go in one direction, then this is the workout for you! This is an approximately 4km loop of the stairs that can be done in either direction. Essentially, you walk up the Chedoke stairs, head up the path to Upper paradise road, follow Scenic Drive east, turn north on Garth Street, walk down the Dundurn stairs, and then finally hike the Chedoke Radial Trial east to end back at the base of the Chedoke stairs.
Unfortunately, there isn’t a sidewalk on a portion of Scenic Drive, but there are bike lanes. It’s a nice workout to do if you want a touch of hiking, a little bit of neighbourhood strolling, and you want to see two sets of historic Hamilton Stairs.
7) Stair Ladder or Good Ol’ Fashioned Intervals
If you’re looking for a very straightforward workout then any kind of interval work on the stairs is a winner. You can do timed intervals, distance intervals, or you can even get fancy and do a ladder workout.
With timed intervals you have a timed rest period followed by a timed work period. It’s totally up to you how you want to tailor your work/rest – for example you can do 30sec on/30 secs rest, or 40 seconds on/20 seconds rest, or 20 seconds on/40 seconds rest. You can also determine how intense your rest period is by either choosing to completely stop or to continue a slow walk up the stairs.
With a distance interval, you can choose to do a certain number of steps before a rest. The easiest would be to do a sprint up one stair flight, followed by a rest on the landing. Then, when your heart rate has settled, repeat. You can do this all the way up to the top of the staircase.
Ladder intervals are a way to make intervals a bit more fun and varied. This is where you work up from an “easier” workout to an intense harder workout, and then back to an “easier” workout. It should parallel the metaphorical idea of climbing a ladder to the top and then climbing back down, with each “rung” of the ladder being a portion of the workout. What this can mean for a timed interval is something along these lines:
- 10 seconds of stair sprints/50 seconds of rest
- 20 seconds of stair sprints/40 seconds of rest
- 30 seconds of stair sprints/30 seconds of rest
- 40 seconds of stair sprints/20seconds of rest
- 50 seconds of stair sprints/10 seconds of rest
- 40 seconds of stair sprints/20 seconds of rest
- 30 seconds of stair sprints/30 seconds rest
- 20 seconds of stair sprints/40 seconds rest
- 10 seconds stair sprints/50 seconds rest
Then rest for 3-5minutes. This ladder is approximately 9 minutes, so you could repeat this 2-3x for a solid workout.
You can also do a ladder interval for distance. It could look something like this:
- 1 flight of stairs sprint, 30 seconds rest
- 2 flights sprint, 60 seconds rest
- 3 flights sprint, 1 minute 30 seconds rest
- 2 flights sprint, 60 seconds rest
- 1 flight sprint, 30 seconds rest
I’ve never attempted this ladder workout, so if you do, you’ll have to let me know how it goes for you. Personally, I’m a big fan of timed workouts, since I find I lose focus with my form if I measure my progress by reps (or in this case steps).
Intervals are fun, and they’re so easy to customize to how you’re feeling on the day, or even in the moment. If you’re tired, just decrease the intensity or number of intervals. Feeling good? Up the work time or repeat the whole thing again.

Prepping for the Stairs:
If you want to get the most out of your workout on the stairs, it pays to prep a little bit. You’ll want to be dressed in the right clothing for the weather and you should be bringing some water with you.
Generally, it is best to visit the Chedoke stairs in the morning when there is less of a crowd. And you’ll want to be considerate of those who are using the stairs just to get from point A to B. In other words, no elbowing your way past someone just so you can complete an interval. Getting there early also helps you snag a parking space, since it gets busier in the summer with golf season.
Most importantly, you should make an effort to go through a proper stretch routine before tackling the stairs. Depending on what you’re doing, you’ll want to put yourself in the best position possible where you’re less likely to get injured. So, stretching is crucial.
When you go up the stairs, in order to work the proper muscles (aka that booty), you’ll want to be using your heels or whole foot to step on each stair, rather than your toes. As you ascend, just pay attention to your body mechanics and which muscles you feel doing the work.
Then, when you’re descending the stairs, pay attention to your surrounding and your feet placement. You’ll need to ensure you’re keeping your knees in a healthy position and that you’re descending in a controlled manner. Again, some have recommended walking the stairs down backward since it might be less stress on your knees, but this obviously opens up other issues (like not being able to see where you’re going).
Finally, don’t be fooled into thinking stair climbing workouts are easy. These sprints are HARD, and you will be sore the next day. It is very humbling.

Post Stair Activities:
After conquering your stair workout, please do not neglect stretching! You will be sore after, and the best way to mitigate any stiffness to stretch when you’re done. Then, I’d recommend spending some time the day after doing even more stretching or if you can handle it, some foam rolling.
I want to end this post by saying that I’m not currently a certified fitness trainer, nor am I a doctor. However, I am a fitness lover – I do really enjoy creating workouts and tackling new athletic challenges. This all being said, please listen to your body and your doctor’s recommendations when it comes to your own physical activity and wellness journey.